Free Light & Shadow Form Studio
A 3D form studio in your browser: basic forms, a head block-in or your own model under a key, fill and rim light you control, with light and shadow families, labeled light terms, posterize and PNG export. Free, with no sign-up.
Label light terms.Names 6 zones on the form: highlight, light side, core shadow, reflected light, cast shadow and occlusion shadow.
Key, fill and rim.The key casts the shadow; a fill lifts the shadow side and a rim edges the form from behind, each with its own color in kelvin.
Posterize values.Bands the scene into 2 to 10 flat gray steps for a value plan.
Light and shadow families.Splits the scene into two values where the key light stops, and reports the share of the form in each.
- Free
- No sign-up
- Runs entirely in your browser
What is a light and shadow reference?
A light and shadow reference is an image of a lit form that shows where the highlight, the form shadow and the cast shadow fall, used to study shading. The Light & Shadow Form Studio renders one live: five basic forms and two arrangements under a light you move, with six shading terms labeled.
How to use the Light & Shadow Form Studio
The tool takes 6 steps, all on your device.
Pick a form (the sphere for gradual tone, the head block-in for planes) or load your own .glb or .obj model.
Move the key light with azimuth and elevation; orbit the camera by dragging, or with the arrow keys.
Add a fill and a rim, set each light's kelvin color, and adjust softness, bounce and ground.
Switch on “Label light terms” to see highlight, light side, core shadow, reflected light, cast shadow and occlusion shadow named on the form.
Use grayscale for a pure value study, and posterize to 3–5 values to design a painting's value structure.
Export a PNG reference at up to 2048 px and pin it next to your easel or import it into your drawing app.
What the Light & Shadow Form Studio does
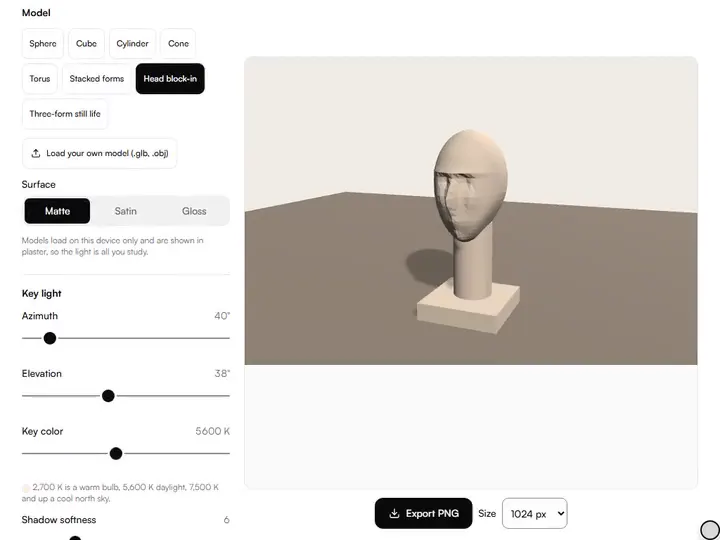
The Light & Shadow Form Studio lights forms, a head or your own model with a light you place, and labels each part of the shadow.
A light you place
The Form Studio shades every form from a key light in real time, with an optional fill and rim, so the terminator and the cast shadow shift together as the key moves. Within our drawing practice tools, it covers form shading on simple solids instead of a busy photo.
Forms, a head, or your model
The Model group offers five solids, Stacked forms, a Three-form still life and a flat-shaded Head block-in whose broad planes catch light like a plaster head. Your own .glb or .obj loads on the device, in plaster.
Labels that follow the light
The label positions are recomputed from the light direction every time it moves. The highlight faces the light, the core shadow sits on the terminator, and the cast shadow lands opposite the light.
Shadow edges from 0 to 25
Shadow softness blurs the key's shadow edges from crisp at 0 to soft at 25; the turn of light across the form stays the same.
An even ambient lift
Ambient / bounce sets a sky-and-ground fill from 0 to 1: upward faces take white from above, downward faces take the Ground color, the reflected light on the shadow side.
Setups kept in the link
The page address stores the form, every light setting, the study modes and export size, so a shared link reopens the same setup.
Artists learning how light turns form
Beginners, art students, art teachers and illustrators study in it how light turns a form.
Beginners
Beginners can light the sphere with Label light terms on and name each zone before shading it.
Art students
Art students can set Posterize values to 4 and check whether planes of the cube merge.
Art teachers
Art teachers can share one link that opens every student on the same form, light angle and study mode.
Illustrators
Illustrators can export the Three-form still life at 2048 px as a lighting reference for a scene.
Why forms teach shading better than photos
A photo of a face buries the lesson in detail; a plain sphere has one thing to say, how light turns across a curved surface, which is why academies have long started students on plaster casts. The sphere teaches the smooth roll from highlight through halftone to the terminator; the cube teaches flat planes with decisive value jumps. The cylinder and cone sit between them, and the torus curves two ways at once.
An apple is a sphere with a dent; a forearm is a cylinder with a taper. Learn the forms in every light, and shading becomes reading instead of guesswork.
The six terms every artist must be able to point to
The highlight faces the light most directly; on these matte forms it is broad. The light side is everything the light reaches, and its label sits halfway to the terminator, in the halftones. The core shadow sits on the terminator, where the surface turns away; in real light it is the darkest part of the form shadow, and placing it is what makes a drawing turn.
Reflected light bounces off the ground back into the shadow side, low and opposite the light. The cast shadow is the shape the form throws onto the ground, and the occlusion shadow is the near-black contact that seats an object instead of letting it float.
Using the light controls like a lighting director
Low elevations throw long cast shadows; high ones pull them in under the form. The default, 135° at 38°, lights the forms from the right of the opening view, so light side and shadow side both show.
Ground color also tints the light bounced up into the shadow side, so a warm ground warms the reflected light. Read the render for the terminator and the cast shadow, and keep the core shadow darker than the reflected-light zone.
Grayscale and posterize: designing values before color
Grayscale neutralizes the whole scene: the forms, the light, the background and the ground. Posterize values bands the frame into evenly spaced steps of perceptual lightness, the reduction a painter makes by squinting. Three steps give a notan reading of light, mid and dark.
For your own photos, the value study maker bands a reference into value steps with thresholds you drag. Here, posterize the still life to four values for a five-minute study, then to eight, and compare what the extra values bought you.
Further reading
The page below goes further into the ideas the Light & Shadow Form Studio works with, and opens on the site named beside it.
- Value, light logic and shading courses on Artistic Masterclass (ArtisticMasterclass.com)
Tips from a working artist
From Sujith Puthran, artist and founder: what I actually do at the easel.
Draw the sphere in one lighting setup daily for a week; by day five your halftones will be cleaner.
Find the core shadow before shading anything else; everything else keys off its placement.
Never let reflected light get as bright as the light side. That's the rule that keeps shadows honest.
Check every drawing for the occlusion shadow at contact points; it's the cheapest realism there is.
Posterize your own reference photos to four values and compare against the 3D forms here.
Export the same form in three different lights and do three quick studies back to back: light direction is a skill of its own.
Questions about the Light & Shadow Form Studio
The 8 questions below start with a first setup and a comparison, then the render's accuracy, then files and privacy.
Using it
What's the best setup for a beginner?
The best setup for a beginner is the sphere, default light, labels on. Draw it. Then turn labels off and name all 6 terms on your own drawing. When you can, move to the cube and repeat.
How do I compare my drawing with the render?
Load the exported PNG into the value checker as the reference, then add a photo of your drawing under Check my painting to compare the two value ranges.
Why do the labels sit slightly off on the cube or torus?
The labels sit slightly off on the cube or torus because the label anchors are computed from a bounding sphere: exact for the sphere, approximate for other forms. They mark where each term lives conceptually; the precise terminator on a cube is a straight plane boundary you'll find faster by looking.
The render
How accurate is the lighting physically?
The lighting is physically accurate in direction, not in bounce, because it is a real-time renderer, not a path tracer. The direct light, terminator and cast shadows are directionally correct, but light bouncing between surfaces is replaced by the even Ambient / bounce control. That is enough for learning light logic; for glass or mirrors, use a full 3D package.
Why only matte white forms?
The forms are only matte white because the lesson is light, not materials. Matte plaster shows the 6 terms without reflections competing with them. Material rendering (metal, skin, glass) is a separate study that comes after this one.
Files and privacy
Does the 3D scene render on my device?
Yes, the scene renders locally with three.js (MIT licensed) via WebGL. Nothing is sent anywhere, and the library loads only when you open this tool.
Can I use the exported PNGs in my own work?
Yes, you can use the exported PNGs in your own work: references you render here are yours. Use them for studies, teaching slides, painting reference or portfolio process shots, no credit required.
Do the labels appear in the exported PNG?
No, the labels do not appear in the exported PNG. The labels are an on-screen overlay, and the PNG holds only the rendered scene, posterized when Posterize values is on.
Pick a form, set the light, and shade the zones you can now name.
Free · No sign-up · Runs in your browser